Wanted User Guide
Wanted is a loan tracking application meant for personal use, for anyone who wants to keep track of these loans.
This guide assumes cursory knowledge of operating a Command Line Interface (CLI). In short, almost all actions in the program are performed by typing in a command in the specified formats below and pressing the Enter key.
This guide can be accessed from the project's Github page or the Help window of the application.
Value Proposition
With Wanted, you can
- Track monetary loans by name
- Repay loans in small amounts
- View transaction history of borrowing and repayment
- Do this all in a gritty, fun interface that resembles a Wanted poster!
Table of Contents
Quick Start
Ensure you have Java
17or above installed in your Computer.
You can find a guide for how to install Java 17 on Windows here. Mac users: Ensure you have the precise JDK version prescribed here.Download the latest
.jarfile from here.Copy the file to the folder you want to use as the home folder for Wanted. We recommend creating a new folder on your Desktop.
Open a command terminal. On Windows, this can be done by clicking the Windows button, typing
cmdand selecting Command Prompt.Use the
cdcommand to navigate to the folder withwanted.jar. On Windows, if you have the folder containingwanted.jaropen in File Explorer, you can right-click the folder name in the address bar near the top and select Copy Address, then typecd, a space, then Ctrl-V.Run
java -jar wanted.jarin the command terminal to run the application.
A GUI similar to the below should appear in a few seconds. Note how the app contains some sample data.
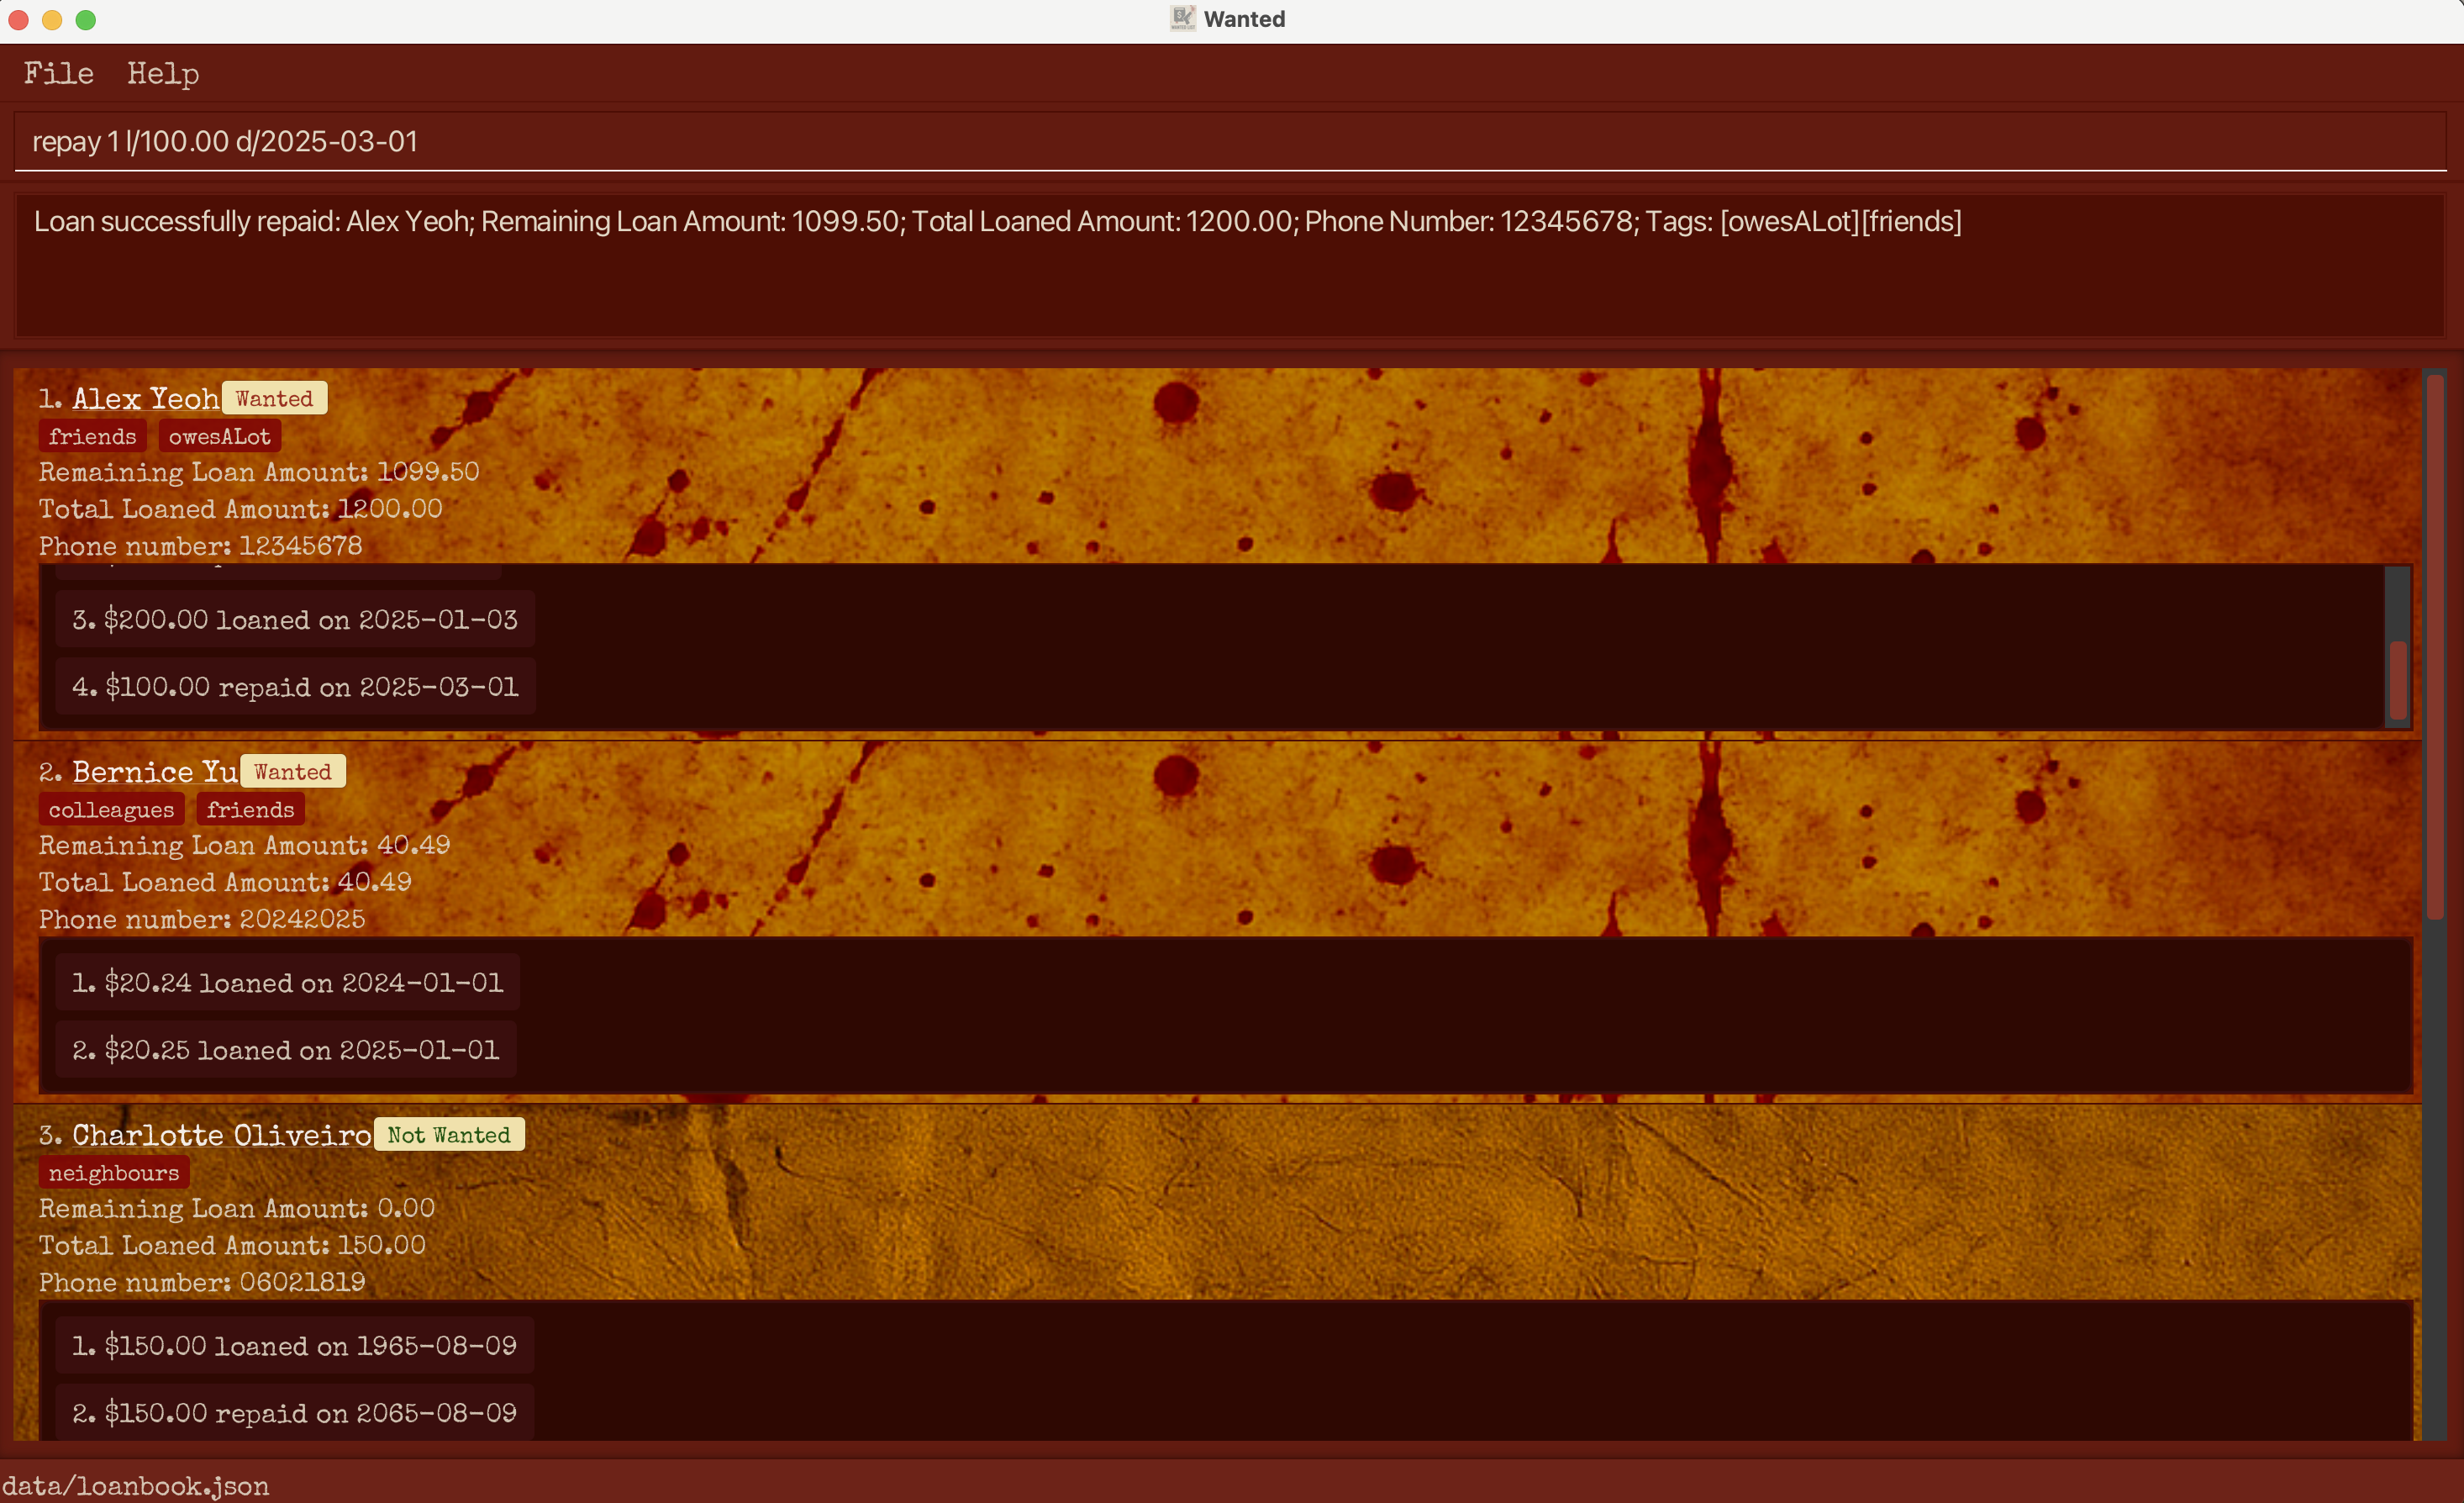
Type the command in the command box and press Enter to execute it. e.g. typing
helpand pressing Enter will open the help window.
Some example commands you can try:add n/John Doe: Adds a new borrower namedJohn Doeto the Wanted list.increase 1 l/19.87 d/2024-12-10: Increases the amount borrowed by the 1st person in the current list and records the transaction in its loan history.repay 2 l/20.25 d/2025-01-01: Decreases the amount borrowed by the 2nd person in the current list and records the transaction in its loan history.delete 3: Deletes the 3rd person shown in the current list.clear: Deletes all persons.exit: Exits the app.
Refer to the Features below for details of each command.
TL;DR
How do I track a loan?
Use the add command to add the loanee’s name to the list, then use the increase command to assign the amount loaned to that person’s entry.
How do I track repayments?
Locate the loanee's entry in the list and use the repay command.
How do I find an entry that I want to modify?
If you remember the loanee’s name, use the find command to find the loan.
To organize your Wanted list, you can use list to arrange by name, or sort to arrange by the remaining amount owed.
User Interface
Overview
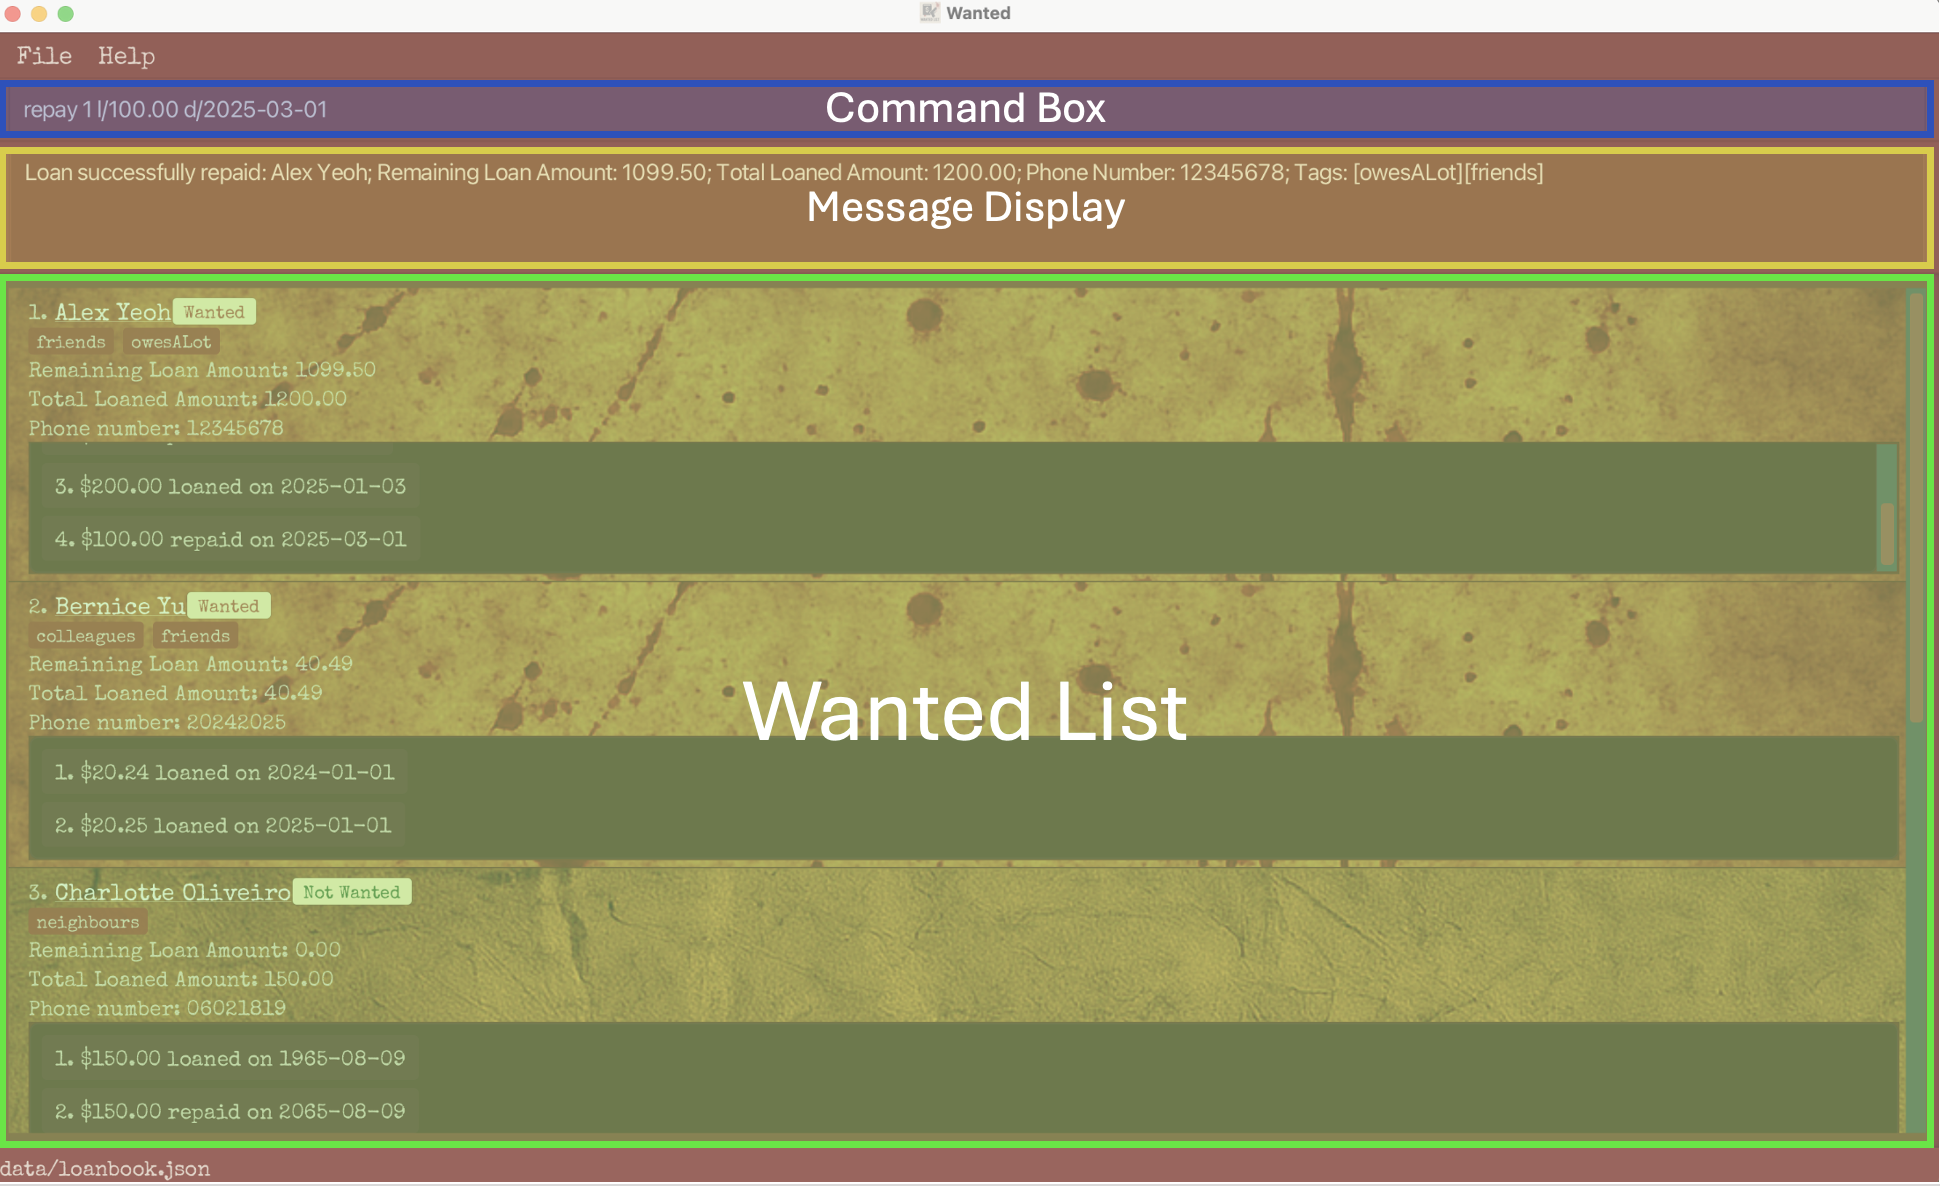
The GUI of the Wanted app consists of three main components: Command Box, Message Display, and Wanted List.
Command Box: This is where you type your commands.
Message Display: When you execute a command (by typing and pressing Enter), the result will appear here.
This may include confirmation messages for successful commands or error messages if the input is invalid.Wanted List: This displays a list of entries currently stored in the app.
If the list exceeds the height of the screen, a scrollbar on the right allows you to scroll through it.
Entries
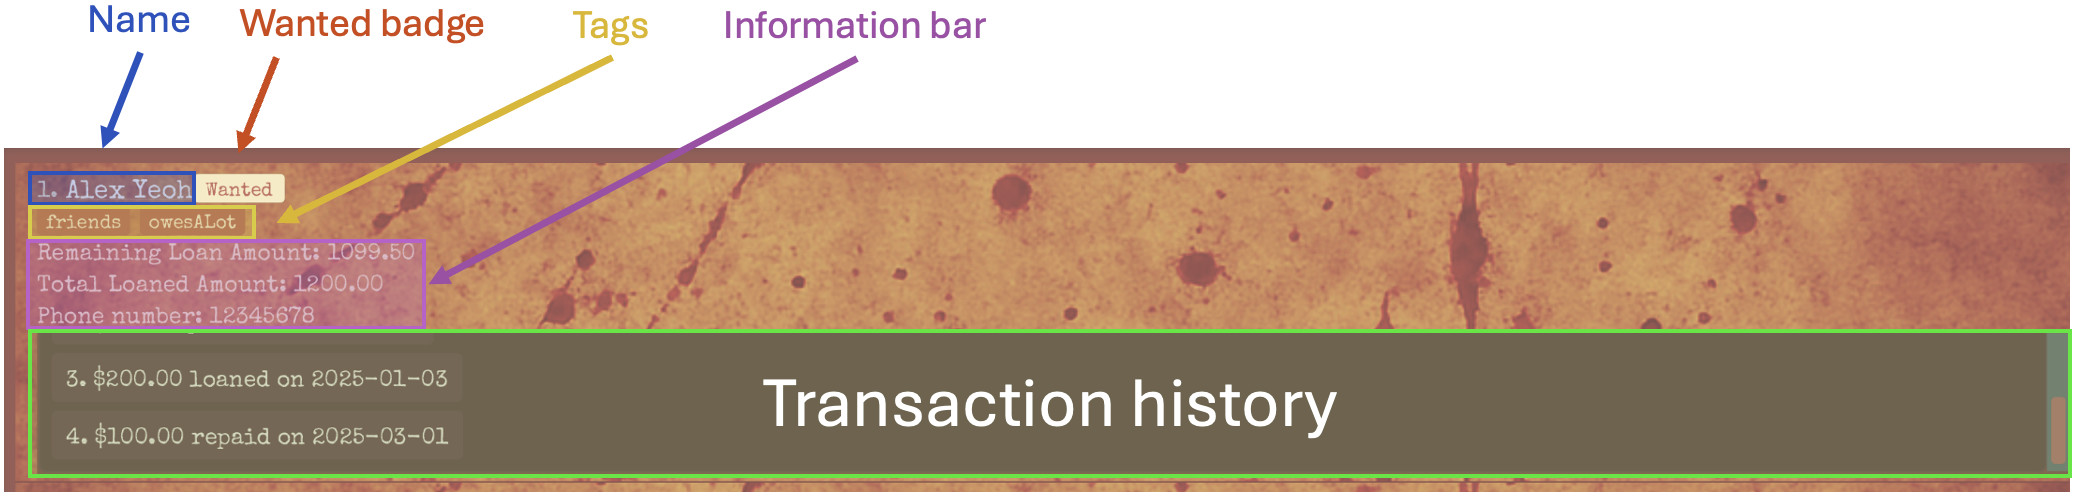
Each entry represents a person and displays their information along with their transaction history.
An entry contains the following components:
Name: Displays the name of the person. The number to the left indicates the index of the entry.
Wanted badge: Indicates whether the person still owes you any money.
It showsWantedif they owe you money, andNot Wantedotherwise.Tags: Displays a list of tags associated with the person.
Information bar: Shows key details about the person, including Remaining Loan Amount, Total Loaned Amount, and phone number.
Remaining Loan Amount refers to the total amount the person still owes across all transactions.
Total Loaned Amount refers to the total sum loaned to the person across all transactions.
Transaction history: Lists all transactions associated with the person.
Each transaction appears in one of the following formats:[amount] loaned on [date]— Indicates that an amount was loaned on the given date.
Example:$100.00 loaned on 2025-01-01[amount] repaid on [date]— Indicates that an amount was repaid on the given date.
Example:$50.00 repaid on 2025-02-01
The number to the left of each transaction indicates its index within the transaction history.
If the transaction list exceeds the height of the display area, the most recent transactions (those with higher indices) are shown by default.
You can scroll upward using the scrollbar on the right to view older transactions.
Tip: The background image of an entry changes depending on whether the person is in the Wanted or Not Wanted status.
Command Summary
| Command | Action | Format |
|---|---|---|
| help | Show help window | help |
| add | Add new entry | add n/[NAME] |
| rename | Change name of entry | rename [ID] n/[NAME] |
| phone | Add/change phone number of entry | phone [ID] p/[PHONE] |
| tag | Add/change tags of entry | tag [ID] t/[TAG]… |
| increase | Add a loan to entry | increase [ID] l/[AMOUNT] d/[DATE] |
| repay | Add a repayment to entry | repay [ID] l/[AMOUNT] d/[DATE] |
| edithist | Edit a transaction in entry | edithist [ID] i/[TRANSACTION ID] (l/[AMOUNT]) (d/[DATE]) |
| delhist | Delete a transaction in entry | delhist [ID] i/[TRANSACTION ID] |
| list | List entries in alphabetic order of name | list |
| sort | Sort entries by loaned amount | sort |
| find | Search entries by name | find [KEYWORD]… |
| delete | Delete an entry | delete [ID] |
| clear | Delete all entries | clear |
| exit | Exit the program | exit |
Note on Features
Notes about the command formats:
Words in square brackets and
UPPER_CASEare the parameters to be supplied by the user.
e.g. inadd n/[NAME],[NAME]is a parameter which can be used asadd n/John Doe.All command keywords are case-sensitive.
e.g.add n/[NAME]cannot be used asAdd n/[NAME]oradd N/[name].Items in round brackets are optional.
e.g(t/[TAG])can be used as(blank) or ast/friend.Items with
…after them can be used multiple times.
e.g.t/[TAG]…can be used ast/friendor ast/friend t/family.Parameters can be in any order.
e.g. if the command specifiesl/[AMOUNT] d/[DATE],d/[DATE] l/[AMOUNT]is also acceptable.Extraneous parameters for commands that do not take in parameters (
help,list,sort,clearandexit) will be ignored.
e.g. if the command specifieshelp 123, it will be interpreted ashelp.Extraneous whitespace before or after parameters will be ignored.
e.g. inadd n/[NAME],add n/ John Doewill be interpreted asadd n/John Doe.
Note that any whitespace within parameters are retained.If you are using a PDF version of this document, note that copying and pasting commands that span multiple lines may not work as intended as space characters surrounding line-breaks may be omitted.
Restrictions on the parameters:
The parameters you provide must meet the following constraints, unless otherwise specified.
Additionally, excessively long inputs or unusually large values may cause the app to behave unexpectedly.
If you encounter an error message indicating that your input is invalid and you're unsure how to correct it, refer to the table below along with the detailed explanations of each command further down.
| Parameter | Constraints | Examples of valid input | Examples of invalid input |
|---|---|---|---|
| ID / TRANSACTION ID | A positive integer | 1, 2, 3 | -1, 0, 1.2 |
| NAME | Must contain only alphanumeric characters and spaces; cannot be blank | John,John y3 | John-Doe, |
| PHONE | Must contain only digits; at least 3 digits required | 12345678, 000 | +65-12345678, 00 |
| TAG | Must contain only alphanumeric characters; cannot contain spaces or be blank | friend, year1 | best friend, year-1, |
| AMOUNT | A non-negative numeric value with at least one digit before the decimal point and exactly two digits after | 123.45, 5.30, 0.00 | $10.00, 3, 3.2, 3.245, -1.00, .50 |
| DATE | Must be in the YYYY-MM-DD format and represent a valid calendar date | 2024-10-15, 2025-01-01 | 2024-10, 1st Jan 2025, 2025-1-10, 2025-01-50 |
| KEYWORD | Cannot contain spaces or be blank | John, john123+$/ | John Doe, |
Viewing help: help
This command displays a link to this User Guide for your reference.

Format: help
Adding an entry: add
This command allows you to add a new person as a new entry to the Wanted list.
Format: add n/[NAME]
(See Notes about the command formats and Restrictions on the parameters)
Explanations:
- This command adds a new entry with the specified
NAME, starting with no loaned or repaid amount, no transaction history, no phone number, and no tags. NAMEmust not already exist in the Wanted list.
Scenario 1: Adding a new entry
Input: add n/Cory Ander
Output:
New loan created for: Cory Ander; Remaining Loan Amount: 0.00; Total Loaned Amount: 0.00; Phone Number: --------; Tags:
Behaviour: You will see a new entry with the name Cory Ander, however take note the money loaned and the money to be returned will be initialised to zero. The transaction history and tags will also be empty.
Scenario 2: Attempting to add an entry with an existing name in the Wanted list
Note: Assume Cory Ander exists at the first index.
Input: add n/Cory Ander
Output:
This person has already loaned out money in the wanted list
Behaviour: You will receive an error message.

Renaming an entry: rename
This commands allows you to change the name of the specified entry in the Wanted list.
Format: rename [ID] n/[NAME]
(See Notes about the command formats and Restrictions on the parameters)
Explanations:
- This command allows you to modify the entry at the specified
ID. The ID refers to the index number shown in the displayed Wanted list. - If
NAMEis equal to the previous name or any other name in the Wanted list, the name will not be updated.
Examples:
Scenario 1: Renaming an entry
Input: rename 1 n/Cory Ander
Output:
Edited loan name: Cory Ander; Remaining Loan Amount: 1199.50; Total Loaned Amount: 1200.00; Phone Number: 12345678; Tags: [owesALot][friends]
Behaviour: The first entry will be renamed to Cory Ander.
Scenario 2: Attempting to rename an entry with the same name
Note: Assume Cory Ander exists at the first index.
Input: rename 1 n/Cory Ander
Output:
New name must be different from the old one.
Behaviour: You will receive an error message.
Scenario 3: Attempting to rename an entry with an existing name in the Wanted list
Note: Assume David Li exists at the second index.
Input: rename 1 n/David Li
Output:
This person already exists in the wanted list.
Behaviour: You will receive an error message.
Adding/Updating phone number: phone
This command allows you to add, change or delete a phone number for an entry in the Wanted list.
Warning: An empty phone number p/ will clear the entry's phone number.
Format: phone [ID] p/[PHONE]
(See Notes about the command formats and Restrictions on the parameters)
Explanations:
- This command allows you to modify the entry at the specified
ID. The ID refers to the index number shown in the displayed Wanted list. - To add or change a phone number,
PHONEmust be non-empty and different from the current phone number (if exists). - To delete a phone number, supply an empty
PHONE(i.e.phone [ID] p/).
Examples:
Scenario 1: Adding a new phone number
Input: phone 1 p/98765432
Output:
Phone number successfully updated: Cory Ander; Remaining Loan Amount: 1199.50; Total Loaned Amount: 1200.00; Phone Number: 98765432; Tags: [owesALot][friends]
Behaviour:
The phone number of your first entry will be updated to 98765432.
Scenario 2: Deleting a phone number
Input: phone 1 p/
Output:
This loan now has no phone number: Cory Ander; Remaining Loan Amount: 1199.50; Total Loaned Amount: 1200.00; Phone Number: --------; Tags: [owesALot][friends]
Behaviour:
The phone number of your first entry will be deleted and instead displayed as No phone number available.
Scenario 3: Attempting to add multiple phone numbers
Note: This command will only be executed when there is one prefix
p/in your input.
Input: phone 1 p/98765432 p/
Output:
Multiple values specified for the following single-valued field(s): p/
Behaviour: You will receive an error message.
Scenario 4: Attempting to update with the same phone number
Note: Assume the phone number of the second entry is initially
20242025.
Input: phone 2 p/20242025
Output:
New phone number must be different from the old one.
Behaviour: You will receive an error message.
Adding/Updating tags: tag
This command allows you to add or delete tag descriptors for an entry.
Tip: An entry can have any number of tags (including 0).
Warning: An empty tag t/ will clear all tags of the entry.
Format: tag [ID] t/[TAG]…
(See Notes about the command formats and Restrictions on the parameters)
Explanations:
- This command allows you to modify the entry at the specified
ID. The ID refers to the index number shown in the displayed Wanted list. - To add a tag,
TAGmust be non-empty, unique to the tag list, and case-insensitive.
When adding multiple tags in a single command:- The system checks if all tags in your command already exist in the tag list (case-insensitive).
- If all tags are already present, no edit will occur.
- If at least one tag is new, then only the unique tags will be added to the list.
- To delete all tags, supply an empty
TAG(i.e.tag [ID] t/).
Examples:
Scenario 1: Adding a new tag
Input: tag 1 t/schoolmate
Note: Assume there initially exists no tags in the first entry.
Output:
Edited loan name: Anna Sue; Remaining Loan Amount: 80.00; Total Loaned Amount: 100.00; Phone Number: --------; Tags: [schoolmate]
Behaviour:
The tags of the first entry will be updated to schoolmate.
Scenario 2: Adding a duplicate tag
Note: Assume the tag
schoolmatealready exists in the first entry. If a tag which does not exist in the current tag list such ast/homeis added, the command will return successfully.
Input: tag 1 t/schoolmate
Output:
Your requested tag(s) already exist(s) for this person
Behaviour: You will receive an error message.
Scenario 3: Adding a tag
Note: Assume the tag
schoolmatealready exists in the first entry.
Input: tag 1 t/CS2103
Output:
Edited loan tags: Anna Sue; Remaining Loan Amount: 80.00; Total Loaned Amount: 100.00; Phone Number: --------; Tags: [schoolmate][CS2103]
Behaviour:
You will see an updated tags list which includes CS2103.
Scenario 4: Adding multiple tags
Note: Assume the tags
schoolmateandCS2103already exist. Scroll to see the entire output.
Input: tag 1 t/owesALot t/shopaholic
Output:
Edited loan tags: Anna Sue; Remaining Loan Amount: 80.00; Total Loaned Amount: 100.00; Phone Number: --------; Tags: [schoolmate][CS2103][owesALot][shopaholic]
Behaviour:
You will see an updated tags list which includes owesALot and shopaholic.
Scenario 5: Deleting all tags
Input: tag 1 t/
Output:
Edited loan name: Anna Sue; Remaining Loan Amount: 80.00; Total Loaned Amount: 100.00; Phone Number: --------; Tags:
Behaviour: All tags for the first entry will be deleted.
Scenario 6: Attempting to add and delete tags in one command
Note: To delete a tag, input only
t/as per scenario 5.
Input: tag 1 t/ t/newtag or tag 1 t/newtag t/
Output:
Tags names should be alphanumeric
Behaviour: You will receive an error message.
Adding a loan: increase
This command allows you to increase the loan of an entry by specifying the loaned amount and date.
Format: increase [ID] l/[AMOUNT] d/[DATE]
(See Notes about the command formats and Restrictions on the parameters)
Explanations:
- This command allows you to increase the loan of the entry at the specified
ID. The ID refers to the index number shown in the displayed Wanted list. - The entry's remaining loan amount and total loaned amount are increased by
AMOUNT. - A new transaction is appended to the end of the entry's transaction history, indicating that the specified
AMOUNTwas loaned on the givenDATE.
Warning: The current version of the Wanted app does not validate whether the dates in a transaction history are in chronological order.
This issue will be addressed in future releases.
Example:
Scenario: Increasing a loan
Note: In all the scenarios below, assume that the remaining loan amount and the total loaned amount of the first entry are initially $100.00.
Input: increase 1 l/50.00 d/2024-12-12
Output:
Loan successfully updated: Alex Yeoh; Remaining Loan Amount: 150.00; Total Loaned Amount: 150.00; Phone Number: --------; Tags: [owesALot][friends]
Behaviour:
Both the remaining loan amount and the total loaned amount will be increased by $50.00. A new transaction, $50.00 loaned on 2024-12-12, will be appended to the end
of the transaction history of the first entry.
Repaying a loan: repay
This command allows you to repay a loan of an entry by specifying the repayment amount and date.
Format: repay [ID] l/[AMOUNT] d/[DATE]
(See Notes about the command formats and Restrictions on the parameters)
Explanations:
- This command allows you to reduce the remaining loan amount of the entry at the specified
ID. The ID refers to the index number shown in the displayed persons list. - The entry's remaining loan amount is reduced by
AMOUNT. - A new transaction is appended to the end of the entry's transaction history, indicating that the specified
AMOUNTwas repaid on the givenDATE. AMOUNTmust not exceed the current remaining loan amount of the entry.
Warning: The current version of the Wanted app does not validate whether the dates in a transaction history are in chronological order.
This issue will be addressed in future releases.
Examples:
Note: In all the scenarios below, assume the remaining loan amount and the total loaned amount of the first entry are initially $100.00.
Scenario 1: Partially repaying a loan
Input: repay 1 l/50.00 d/2025-01-01
Output:
Loan successfully repaid: John Doe; Remaining Loan Amount: 50.00; Total Loaned Amount: 100.00; Phone Number: --------; Tags:
Behaviour:
The remaining loan amount of the first entry will be reduced by $50.00 (the total loaned amount will remain unchanged).
A new transaction, $50.00 repaid on 2025-01-01, will be appended to the end of the transaction history of the first entry.
Scenario 2: Fully repaying a loan
Input: repay 1 l/100.00 d/2025-01-01
Output:
Loan successfully repaid entirely: John Doe; Remaining Loan Amount: 0.00; Total Loaned Amount: 100.00; Phone Number: --------; Tags:
Behaviour:
The remaining loan amount of the first entry will be reduced by $100.00. (The total loaned amount will remain unchanged.)
A new transaction, $100.00 repaid on 2025-01-01, will be appended to the end of the transaction history of the first entry.
Scenario 3: Overpayment (invalid input)
Input: repay 1 l/150.00 d/2025-01-01
Output:
Amount repaid should be less than or equal to the current remaining loan amount
Behaviour: You will receive an error message.
Editing a transaction: edithist
This command allows you to edit an existing transaction in the transaction history of an entry.
Format: edithist [ID] i/[TRANSACTION ID] (l/[AMOUNT]) (d/[DATE])
(See Notes about the command formats and Restrictions on the parameters)
Explanations:
- This command allows you to edit a transaction of the entry at the specified
ID. The ID refers to the index number shown in the displayed persons list. - The transaction to be edited is specified by
TRANSACTION ID, which refers to the index number shown in the displayed transaction history of the selected entry. - If
AMOUNTis provided, the transaction amount is updated to the specified value. The newAMOUNTmust be different from the original. - If
DATEis provided, the transaction date is updated to the specified value. The newDATEmust be different from the original. - At least one of
AMOUNTorDATEmust be provided. - The update must not result in a negative remaining loan amount at any point in the transaction history.
Warning: The current version of the Wanted app does not validate whether the dates in a transaction history are in chronological order.
This issue will be addressed in future releases.
Examples:
Note: In all the scenarios below, assume the first entry is initially as follows:
Remaining loaned amount: $150.00
Total loaned amount: $200.00
Transaction history:
(1.) $100.00 loaned on 2025-01-01
(2.) $50.00 repaid on 2025-02-01
(3.) $100.00 loaned on 2025-03-01
Scenario 1: Editing amount
Input: edithist 1 i/2 l/100.00
Output:
Loan successfully updated: John Doe; Remaining Loan Amount: 100.00; Total Loaned Amount: 200.00; Phone Number: --------; Tags:
Behaviour:
The second transaction of the first entry will be changed to $100.00 repaid on 2025-02-01.
As a result, the remaining loan amount will be updated to $100.00.
Scenario 2: Editing date
Input: edithist 1 i/2 d/2025-02-02
Output:
Loan successfully updated: John Doe; Remaining Loan Amount: 150.00; Total Loaned Amount: 200.00; Phone Number: --------; Tags:
Behaviour:
The second transaction of the first entry will be changed to $50.00 repaid on 2025-02-02.
Scenario 3: Editing both amount and date
Input: edithist 1 i/3 l/200.00 d/2025-02-02
Output:
Loan successfully updated: John Doe; Remaining Loan Amount: 250.00; Total Loaned Amount: 300.00; Phone Number: --------; Tags:
Behaviour:
The third transaction of the first entry will be changed to $200.00 loaned on 2025-02-02.
As a result, the remaining loan amount and the total loaned amount will be updated to $250.00 and $300.00, respectively.
Scenario 4: Edit resulting in a negative remaining loan amount (invalid input)
Input: edithist 1 i/1 l/30.00
Output:
Invalid transaction update: This update would result in a negative remaining loan amount at some point in the history
Behaviour: You will receive an error message. If the amount of the first transaction were changed to $30.00, the remaining loan amount after the second transaction would be $30.00 - $50.00 = $-20.00, which is not allowed.
Deleting a transaction: delhist
This command allows you to delete an existing transaction in the transaction history of an entry.
Format: delhist [ID] i/[TRANSACTION ID]
(See Notes about the command formats and Restrictions on the parameters)
Explanations:
- This command allows you to delete a transaction from the entry at the specified
ID. The ID refers to the index number shown in the displayed persons list. - The transaction to be deleted is specified by
TRANSACTION ID, which refers to the index number shown in the displayed transaction history of the selected entry. - The deletion must not result in a negative remaining loan amount at any point in the transaction history.
Warning: The current version of the Wanted app does not validate whether the dates in a transaction history are in chronological order.
This issue will be addressed in future releases.
Examples:
Note: In all the scenarios below, assume the first entry is initially as follows:
Remaining loaned amount: $150.00
Total loaned amount: $200.00
Transaction history:
(1.) $100.00 loaned on 2025-01-01
(2.) $50.00 repaid on 2025-02-01
(3.) $100.00 loaned on 2025-03-01
Scenario 1: Deleting a transaction
Input: delhist 1 i/2
Output:
Loan successfully updated: John Doe; Remaining Loan Amount: 200.00; Total Loaned Amount: 200.00; Phone Number: --------; Tags:
Behaviour: The second transaction of the first entry will be deleted. As a result, the remaining loan amount will be updated to $200.00.
Scenario 2: Deletion resulting in a negative remaining loan amount (invalid input)
Input: delhist 1 i/1
Output:
Invalid transaction update: This update would result in a negative remaining loan amount at some point in the history
Behaviour: You will receive an error message. If the first transaction were deleted, the remaining loan amount after the second transaction (which would become the new first) would be $-50.00, which is not allowed.
Listing all entries: list
This command allows you to list all entries in the Wanted list in alphabetical order of name.
Format: list
Warning: The list command changes the IDs of each entry. Be careful to use the correct IDs when editing or deleting entries.
Explanations:
- All entries in the Wanted list are displayed in alphabetical order of name.
Examples:
Note: In all the scenarios below, assume there are a list of names as follows:
(1.) John
(2.) John Mayer
(3.) Joanna Lee
(4.) Bernice Chua
(5.) Alex Yeoh
Scenario 1: Listing all entries
Input: list
Output:
Listed the persons in alphabetical order of name
Behaviour: An alphabetical sorting of all persons will take place. The Wanted list will be arranged as follows:
(1.) Alex Yeoh
(2.) Bernice Chua
(3.) Joanna Lee
(4.) John
(5.) John Mayer
Sorting entries: sort
This commands allows you to sort the entries in descending order of remaining loan amount.
Format: sort
Warning: The sort command changes the IDs of each entry. Be careful to use the correct IDs when editing or deleting entries.
Explanations:
- The entries are sorted in descending order of remaining loan amount.
- The person with the largest remaining loan amount will be displayed at the top of the Wanted list.
Examples:
Note: Assume there are a list of entries as follows: (1.) John Remaining Loan Amount: 21.05 Total Loaned Amount: 23.05
(2.) Alex Yeoh Remaining Loan Amount: 0.00 Total Loaned Amount: 0.00
(3.) Bernice Chua
Remaining Loan Amount: 21.05 Total Loaned Amount: 21.05
Scenario 1: Sorting
Input: sort
Output:
Sorted the persons in descending order of remaining loan amount
Behaviour:
- The entries will be sorted in descending order of remaining loan amount
- The list of entries will be reordered as follows:
(1.) John Remaining Loan Amount: 21.05 Total Loaned Amount: 23.05
(2.) Bernice Chua
Remaining Loan Amount: 21.05 Total Loaned Amount: 21.05
(3.) Alex Yeoh Remaining Loan Amount: 0.00 Total Loaned Amount: 0.00
Locating entries by name: find
This command allows you to find entries whose names contain any of the given keywords.
Format: find [KEYWORD]...
(See Notes about the command formats and Restrictions on the parameters)
Warning: The find command changes the IDs of each entry. Be careful to use the correct IDs when editing or deleting entries.
Explanations:
- This command sorts the best match to the keywords entered at the top of the Wanted list.
- The search is case-insensitive. e.g
hanswill matchHans - The order of the keywords does not matter. e.g.
Hans Bowill matchBo Hans - Only the name is searched and matched.
- Partial matches will be returned. e.g.
Hanwill also matchHans - The best match to the keywords will be returned at the top of the Wanted list (i.e.
ORsearch). e.g.Hans Bowill returnHans Gruber,Bo Yang - The output message will display the number of full matches.
Examples:
Note: In all the scenarios below, assume there are a list of names as follows:
(1.) John
(2.) John Mayer
(3.) Joanna Lee
(4.) Bernice Chua
(5.) Alex Yeoh
Scenario 1: Finding by name
Input: find John
Output:
2 persons found!
Behaviour: The best match, John will be sorted to the top of the Wanted list. John Mayer will be sorted to the second place on the Wanted list. Remaining entries will keep their relative positions.
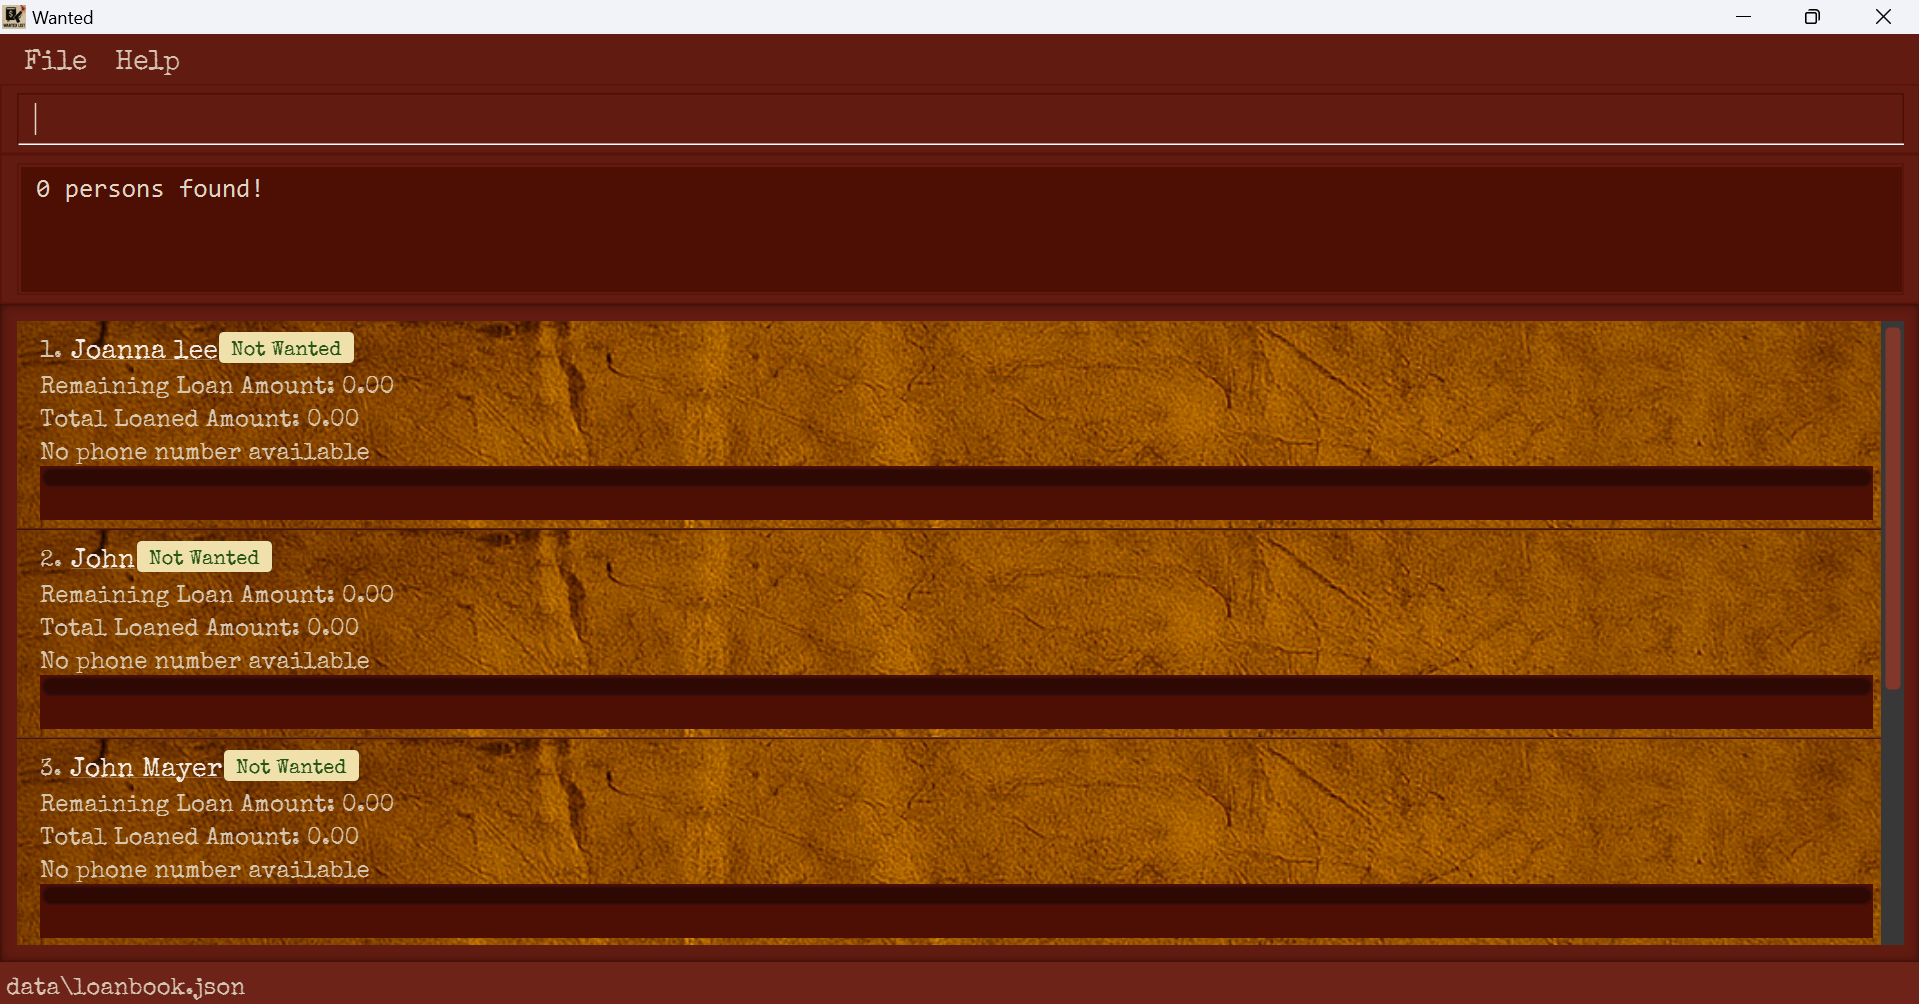
Scenario 2: Finding by name (partial)
Input: find jo
Output:
0 persons found!
Behaviour:
- Since there are no complete matches to any keywords entered, the output message will indicate that there are 0 full matches.
- Names that partially contain 'jo' will be moved up on the Wanted List.
- In this example, the output list will be:
(1.) Joanna Lee
(2.) John
(3.) John Mayer
(4.) Bernice Chua
(5.) Alex Yeoh
- Partial matches are displayed in alphabetical order.
Deleting an entry: delete
This command allows you to delete a specified entry from the Wanted list.
Format: delete [ID]
(See Notes about the command formats and Restrictions on the parameters)
Warning: The list, sort, and find commands change the IDs of each entry. Be careful to use the correct IDs when editing or deleting entries.
Explanations:
- This command allows you to delete the entry at the specified
ID. The ID refers to the index number shown in the displayed persons list.
Example:
Scenario: Deleting an entry
Input: delete 2
Output:
Deleted Loan: Bernice Yu; Remaining Loan Amount: 40.49; Total Loaned Amount: 40.49; Phone Number: 20242025; Tags: [colleagues][friends]
Behaviour: The second entry will be deleted from the Wanted list.
Clearing all entries: clear
This command allows you to clear all entries from the Wanted list.
Warning: All loan entries will be wiped. This command is irreversible. You should exercise caution when running this command.
Format: clear
Exiting the program: exit
This command allows you to exit the program.
Format: exit
Saving the data
Wanted saves the Wanted list after each operation that modifies it. There is no need to save manually.
Backing up data files
Wanted data is saved automatically as a JSON file [JAR file location]/data/loanbook.json. Copy this file to another folder to create a backup.
Transferring data across devices
If you wish to transfer your saved data to another device, install Wanted on the new device and replace the JSON data file in [JAR file location]/data/loanbook.json with the data file from the old device.
Known Issues
- The GUI may not be visible and appear off-screen if you use multiple screens, move the application to a secondary screen, and later switch to using only
the primary screen. To resolve this, you should delete the
preferences.jsonfile created by the application in the same folder aswanted.jarbefore running the application again. - The Help Window may not appear if you minimize the Help Window and then run the
helpcommand (or use theHelpmenu, or the keyboard shortcutF1) again. To resolve this, you should open the Help Window again by selecting it. If it is not visible in the sidebar, you should try finding it by holding down the Alt key and pressing Tab.